C# WinUI 3アプリを作っていく途中で、調べたことを忘録的に投稿します。今回はWinUI3プロジェクトで[ICompositionSupportsSystemBackdrop]を利用してウィンドウの背景を半透明にする手順です。
[ICompositionSupportsSystemBackdrop]を利用
長い名前のインターフェイスですが[ICompositionSupportsSystemBackdrop]を利用してウィンドウを半透明にできます。
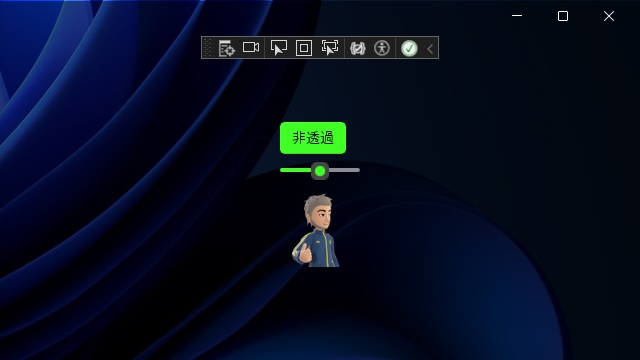
先回、紹介した[SetLayeredWindowAttributes]関数でもウィンドウを透過にできますが、この方法だと透過する対象がウィンドウのみで、ボタンなどのウィンドウに追加されたコントロールは透過しません。(ウィンドウの背景透過のイメージです)
透過を切り替えるためのボタンなどを用意した画面を作成します。
<Grid VerticalAlignment="Stretch" HorizontalAlignment="Stretch">
    <StackPanel Orientation="Vertical" VerticalAlignment="Center" HorizontalAlignment="Center">
        <ToggleButton Name="myButton" Checked="myButton_Checked" Unchecked="myButton_Unchecked">透過</ToggleButton>
        <Slider Name="mySlider" ValueChanged="mySlider_ValueChanged" Minimum="10" Maximum="255" Value="128" />
        <Image Source="image.png" Width="80"/>
    </StackPanel>
</Grid>
[ICompositionSupportsSystemBackdrop]を利用するためのコードを追加します。
bool IsTransparent = false;

[StructLayout(LayoutKind.Sequential)]
unsafe private struct PAINTSTRUCT
{
  public IntPtr hdc;
  public bool fErase;
  public RECT rcPaint;
  public bool fRestore;
  public bool fIncUpdate;
  public fixed byte rgbReserved[32];
}

[StructLayout(LayoutKind.Sequential)]
private struct RECT
{
  public int left;
  public int top;
  public int right;
  public int bottom;
}

private enum DWM_BLURBEHIND_Mask
{
  DWM_BB_ENABLE = 0X00000001,
  DWM_BB_BLURREGION = 0X00000002,
  DWM_BB_TRANSITIONONMAXIMIZED = 0x00000004
}

[StructLayout(LayoutKind.Sequential)]
private struct DWM_BLURBEHIND
{
  public DWM_BB dwFlags;
  public bool fEnable;
  public IntPtr hRgnBlur;
  public bool fTransitionOnMaximized;
}

[Flags]
private enum DWM_BB
{
  DWM_BB_ENABLE = 1,
  DWM_BB_BLURREGION = 2,
  DWM_BB_TRANSITIONONMAXIMIZED = 4
}

private enum StockObjectType
{
  BLACK_BRUSH = 4
}

[DllImport("Gdi32.dll", EntryPoint = "CreateRectRgn")]
private static extern IntPtr CreateRectRgn(int x1, int y1, int x2, int y2);

[DllImport("gdi32.dll")]
private static extern IntPtr GetStockObject(int fnObject);

[DllImport("dwmapi.dll", PreserveSig = false)]
private static extern void DwmEnableBlurBehindWindow(IntPtr hwnd, ref DWM_BLURBEHIND blurBehind);

[DllImport("user32.dll")]
private static extern IntPtr CallWindowProc(IntPtr lpPrevWndFunc, IntPtr hWnd, uint Msg, IntPtr wParam, IntPtr lParam);

[DllImport("user32.dll", EntryPoint = "SetWindowLongPtr")]
private static extern IntPtr SetWindowLongPtr64(IntPtr hWnd, WindowLongIndexFlags nIndex, WinProc newProc);

private delegate IntPtr WinProc(IntPtr hWnd, uint Msg, IntPtr wParam, IntPtr lParam);

[DllImport("user32.dll")]
private static extern IntPtr BeginPaint(IntPtr hwnd, out PAINTSTRUCT lpPaint);

[DllImport("user32.dll")]
private static extern int FillRect(IntPtr hDC, ref RECT lprc, IntPtr hbr);

private WinProc? newWidProc = null;
private IntPtr oldWidProc = IntPtr.Zero;
private const int WM_PAINT = 0x000F;
private const int WM_NCCALCSIZE = 0x0083;
public TransparentWindow()
{
  this.InitializeComponent();
  this.ExtendsContentIntoTitleBar = true;
  this.SetTitleBar(AppTitlebar);

  nint hWnd = new IntPtr((long)this.AppWindow.Id.Value);
  nint rectRgn = CreateRectRgn(0, 0, 1, 1);

  DWM_BLURBEHIND dwmblurBehind = new DWM_BLURBEHIND();
  dwmblurBehind.dwFlags = (DWM_BB)(DWM_BLURBEHIND_Mask.DWM_BB_ENABLE | DWM_BLURBEHIND_Mask.DWM_BB_BLURREGION);
  dwmblurBehind.fEnable = true;
  dwmblurBehind.hRgnBlur = rectRgn;
  DwmEnableBlurBehindWindow(hWnd, ref dwmblurBehind);
  SubClassing();
}

private void SubClassing()
{
  nint hwnd = WinRT.Interop.WindowNative.GetWindowHandle(this);
  newWidProc = new WinProc(NewWindowProc);
  oldWidProc = SetWindowLongPtr64(hwnd, WindowLongIndexFlags.GWL_WNDPROC, newWidProc);
}

private IntPtr NewWindowProc(IntPtr hWnd, uint Msg, IntPtr wParam, IntPtr lParam)
{
  switch (Msg)
  {
    case WM_PAINT:
      nint? hdc = BeginPaint(hWnd, out var ps);
      if (hdc == null)
      {
        return new IntPtr(0);
      }

      nint brush = GetStockObject((int)StockObjectType.BLACK_BRUSH);
      FillRect((nint)hdc, ref ps.rcPaint, brush);
      return new IntPtr(1);

    case WM_NCCALCSIZE:
      return new IntPtr(0);

  }
  return CallWindowProc(oldWidProc, hWnd, Msg, wParam, lParam);
}

public static void SetTransparent(Window window, bool IsTransparent, Windows.UI.Color color)
{
  var compositionSupport = window.As<ICompositionSupportsSystemBackdrop>();
  if (IsTransparent)
  {
    var transparentColor = WindowsCompositionHelper.Compositor.CreateColorBrush(color);
    compositionSupport.SystemBackdrop = transparentColor;
  }
  else
  {
    compositionSupport.SystemBackdrop = null;
  }
}
最後に、コントロールに追加したイベントを追加します。
private void ApplyTransparent(bool IsTransparent)
{
  SetTransparent(this, IsTransparent, Windows.UI.Color.FromArgb((byte)mySlider.Value, 0, 0, 0));
}

private void mySlider_ValueChanged(object sender, RangeBaseValueChangedEventArgs e)
{
  SetTransparent(this, IsTransparent, Windows.UI.Color.FromArgb((byte)mySlider.Value, 0, 0, 0));
}

private void myButton_Checked(object sender, RoutedEventArgs e)
{
  ApplyTransparent(true);
  myButton.Content = "非透過";
}

private void myButton_Unchecked(object sender, RoutedEventArgs e)
{
  ApplyTransparent(false);
  myButton.Content = "透過";
}
実行後[透過]ボタンを選択するとウィンドウが半透明になります。
[ICompositionSupportsSystemBackdrop]を利用してウィンドウに透過処理を行うと、ボタンやスライダーなどのウィンドウに配置されたコントロールは透過しません。
そのため、背景だけ透過にしたい場合に有効です。
まとめ
今回は、WinUI3プロジェクトで[ICompositionSupportsSystemBackdrop]を利用してウィンドウの背景を半透明にする手順手順について紹介しました。
Win32で用意されている[SetLayeredWindowAttributes]関数と異なり、実行時にウィンドウのみを透過にできます。
ウィンドウ上に追加したボタンなどのコントロールも透過されないので背景だけを透過にすることが可能です。
WinUI 3で実行時にウィンドウを半透明にしたい人の参考になれば幸いです。
スポンサーリンク
最後までご覧いただき、ありがとうございます。

