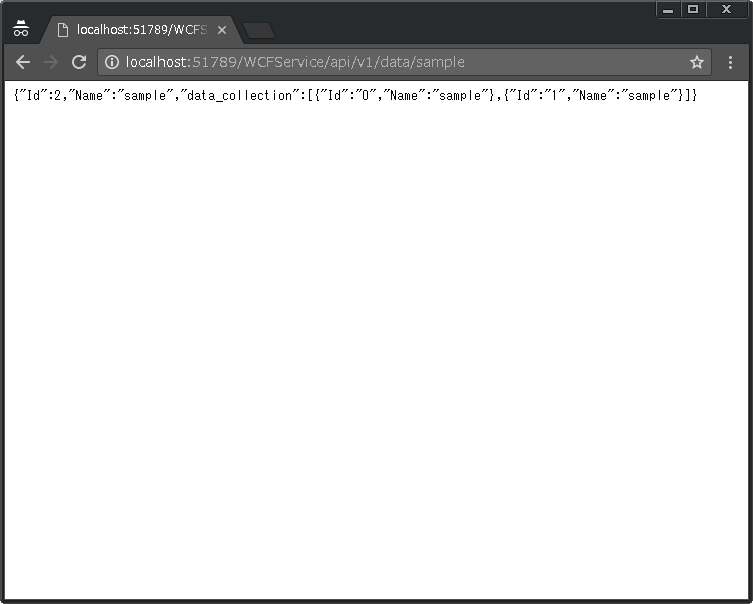
IISで提供できるREST Web APIを作成しようとして、試行錯誤していたら結構面倒だったので備忘録的な記事。
基本は、WCF(Windows Communication Foundation)で作成するのがお約束みたいです。
WebサイトのURLに対してGETメソッドでアクセスして、URL上のパラメタを判断してJSON形式で値を戻すREST APIを作成することを目標にします。
プロジェクトを作成しないと始まらないので以下の手順で作成(VS2010以降メニューの名前などが多少異なりますが同じ手順で作成できます)
- Visual Studioで[ファイル|新規作成|プロジェクト]で[ASP.NET 空のWebアプリケーション]を作成
フレームワークは[.NET Framework 4]を選択(Client Profileではありません)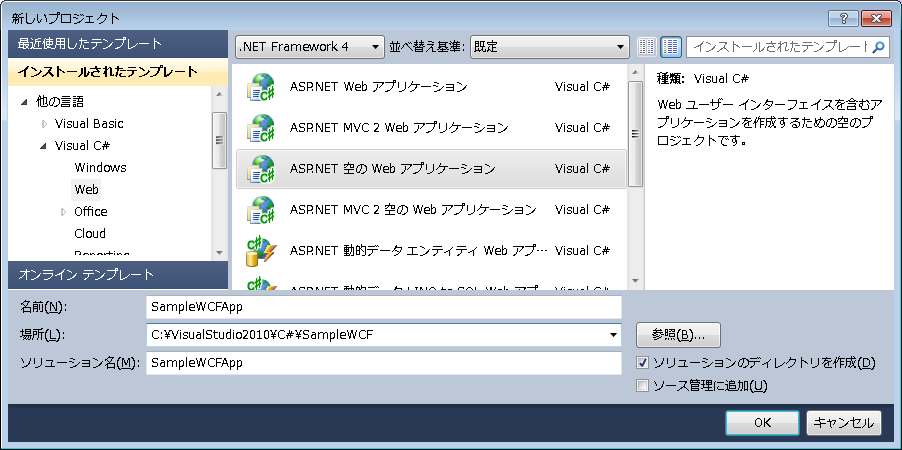
- ソリューションに、新しいプロジェクトに[WCF サービス ライブラリ]を追加する。
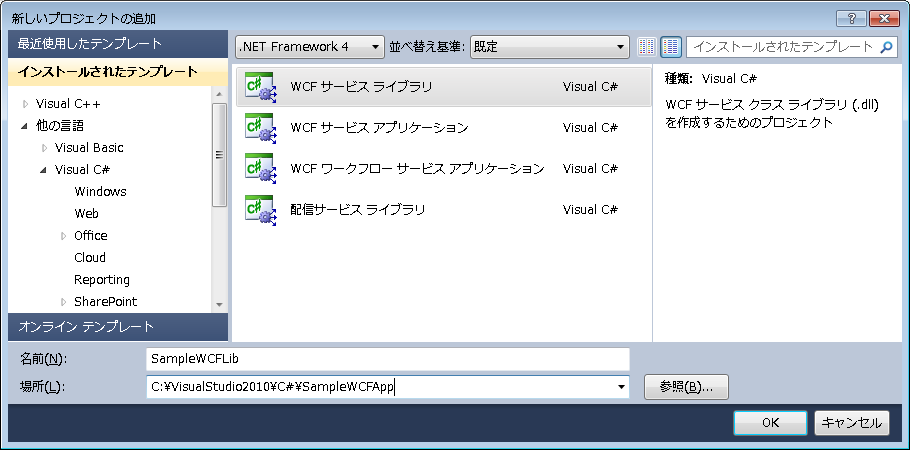
- 一旦ビルドする。
- 各プロジェクトの参照設定に、Webサイトには[System.ServiceModel]、[System.ServiceModel.Activation]、[System.ServiceModel.Web]と[プロジェクト]の[SampleWCFLib]を追加して、WCFサービスには、[System.ServiceModel]、[System.ServiceModel.Web]を追加する。
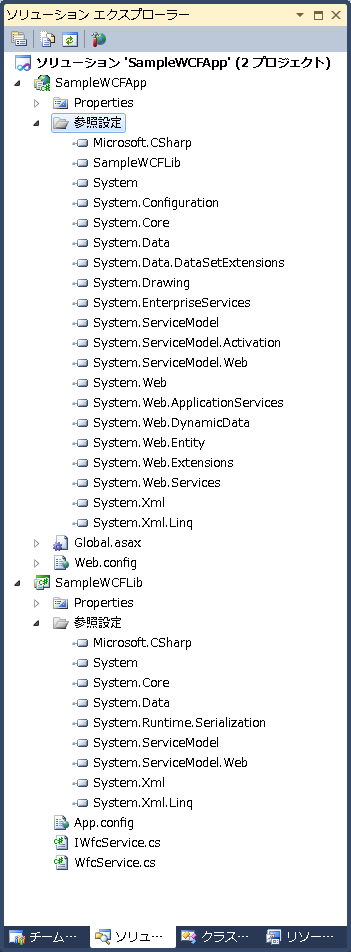
- [SampleWCFLib]プロジェクトの[IService1.cs]と[Service1.cs]を変更します。(例:IService1.cs → IWfcService.cs、Service1.cs → WfcService.cs)
- 変更する場合に、すべての参照をすべて変更する画面は[はい]を選択します。
- IWfcService.csとWfcService.csの内容を開きます。
テンプレの状態で、[GetData]メソッドと[GetDataUsingDataContract]メソッドが記載されているので、今回はバッサリ削除します。IWfcService.csusing System; using System.Collections.Generic; using System.Linq; using System.Runtime.Serialization; using System.ServiceModel; using System.Text; namespace SampleWCFLib { // メモ: [リファクター] メニューの [名前の変更] コマンドを使用すると、コードと config ファイルの両方で同時にインターフェイス名 "IService1" を変更できます。 [ServiceContract] public interface IWfcService { /* [OperationContract] string GetData(int value); [OperationContract] CompositeType GetDataUsingDataContract(CompositeType composite); */ // TODO: ここにサービス操作を追加します。 } // サービス操作に複合型を追加するには、以下のサンプルに示すようにデータ コントラクトを使用します。 /* [DataContract] public class CompositeType { bool boolValue = true; string stringValue = "Hello "; [DataMember] public bool BoolValue { get { return boolValue; } set { boolValue = value; } } [DataMember] public string StringValue { get { return stringValue; } set { stringValue = value; } } } */ }WfcService.cs
using System; using System.Collections.Generic; using System.Linq; using System.Runtime.Serialization; using System.ServiceModel; using System.Text; namespace SampleWCFLib { // メモ: [リファクター] メニューの [名前の変更] コマンドを使用すると、コードと config ファイルの両方で同時にクラス名 "Service1" を変更できます。 public class WfcService : IWfcService { /* public string GetData(int value) { return string.Format("You entered: {0}", value); } public CompositeType GetDataUsingDataContract(CompositeType composite) { if (composite == null) { throw new ArgumentNullException("composite"); } if (composite.BoolValue) { composite.StringValue += "Suffix"; } return composite; } */ } } - IWCFService.csを編集して、メソッドと戻り値JSON用の構造体を定義します。
using System; using System.Collections.Generic; using System.Linq; using System.Runtime.Serialization; using System.ServiceModel; using System.Text; namespace SampleWCFLib { // メモ: [リファクター] メニューの [名前の変更] コマンドを使用すると、コードと config ファイルの両方で同時にインターフェイス名 "IService1" を変更できます。 [ServiceContract] public interface IWfcService { // TODO: ここにサービス操作を追加します。 [OperationContract] DataList GetData(string name); } // サービス操作に複合型を追加するには、以下のサンプルに示すようにデータ コントラクトを使用します。 [DataContract(Namespace = "", Name = "DataList")] public class DataList { [DataMember] public int Id; [DataMember] public string Name; [DataMember] public List<DataItem> data_collection; [DataContract] public class DataItem { [DataMember] public string Id; [DataMember] public string Name; } } } - WCFService.csを編集して、メソッドを実装します。
using System; using System.Collections.Generic; using System.Linq; using System.Runtime.Serialization; using System.ServiceModel; using System.ServiceModel.Web; using System.ServiceModel.Activation; using System.Text; using System.Runtime.Serialization.Json; namespace SampleWCFLib { // メモ: [リファクター] メニューの [名前の変更] コマンドを使用すると、コードと config ファイルの両方で同時にクラス名 "Service1" を変更できます。 public class WfcService : IWfcService { [WebGet(UriTemplate = "api/v1/data/{name}", ResponseFormat = WebMessageFormat.Json)] public DataList GetData(string name) { int count = 0; DataList sl = new DataList(); sl.data_collection = new System.Collections.Generic.List<DataList.StampItem>(); for (int nLoop = 0; nLoop < 2; nLoop++) { DataList.DataItem item = new DataList.DataItem(); item.Name = name; item.Id = count.ToString(); sl.data_collection.Add(item); count++; } sl.Id = count; sl.Name = name; return sl; } } } - [SampleWCFApp]の[Web.config]を編集して、WCFがASP環境で動作する[aspNetCompatibilityEnabled]属性を追加します。
<?xml version="1.0" encoding="utf-8"?>
<!-- ASP.NET アプリケーションの構成方法の詳細については、 http://go.microsoft.com/fwlink/?LinkId=169433 を参照してください -->
<configuration>
<system.web>
<compilation debug="true" targetFramework="4.0" />
</system.web>
<system.serviceModel>
<!-- WCFがASP.NET環境で動くように -->
<serviceHostingEnvironment aspNetCompatibilityEnabled="true" />
</system.serviceModel>
</configuration>
- [SampleWCFApp]に[Global.asax]を追加して、ASPに要求されたURLでWCFのサービスにアクセスできるようにします。
using System; using System.Collections.Generic; using System.Linq; using System.Web; using System.Web.Security; using System.Web.SessionState; using System.ServiceModel; using System.ServiceModel.Activation; using System.ServiceModel.Web; namespace DsServiceApp { public class Global : System.Web.HttpApplication { protected void Application_Start(object sender, EventArgs e) { //WCFServiceというURLでアクセスSampleWCFLib.WfcServiceクラスで実装してるサービスにアクセスできるようにする。 System.Web.Routing.RouteTable.Routes.Add(new ServiceRoute("WCFService", new WebServiceHostFactory(), typeof(SampleWCFLib.WfcService))); } protected void Session_Start(object sender, EventArgs e) { } protected void Application_BeginRequest(object sender, EventArgs e) { } protected void Application_AuthenticateRequest(object sender, EventArgs e) { } protected void Application_Error(object sender, EventArgs e) { } protected void Session_End(object sender, EventArgs e) { } protected void Application_End(object sender, EventArgs e) { } } } - ビルドを行い、デバッグ実行を行います。開発用のWebサーバーが起動しブラウザが表示されます。
- アドレスに、http://localhost/WFCService/api/v1/data/sample と入力します。
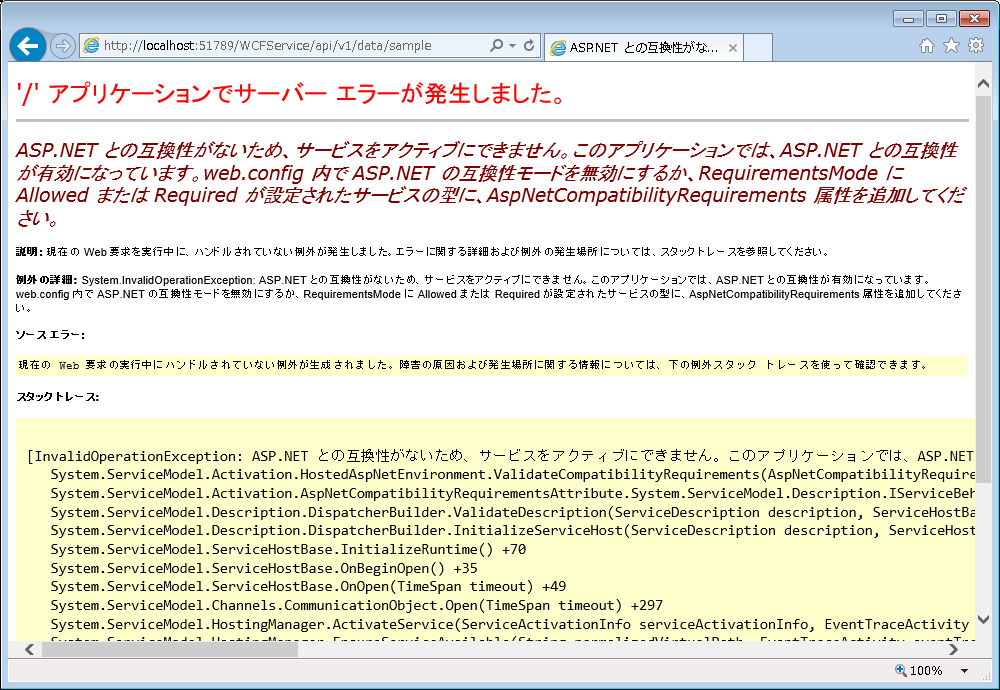
- ASP.NETのエラー画面が表示されます。
- WcfService.csを編集して[AspNetCompatibilityRequirements]属性を追加します。
using System; using System.Collections.Generic; using System.Linq; using System.Runtime.Serialization; using System.ServiceModel; using System.ServiceModel.Web; using System.ServiceModel.Activation; using System.Text; using System.Runtime.Serialization.Json; namespace SampleWCFLib { // メモ: [リファクター] メニューの [名前の変更] コマンドを使用すると、コードと config ファイルの両方で同時にクラス名 "Service1" を変更できます。 [AspNetCompatibilityRequirements(RequirementsMode = AspNetCompatibilityRequirementsMode.Required)] public class WfcService : IWfcService { [WebGet(UriTemplate = "api/v1/data/{name}", ResponseFormat = WebMessageFormat.Json)] public DataList GetData(string name) { int count = 0; DataList sl = new DataList(); sl.data_collection = new System.Collections.Generic.List<DataList.DataItem>(); for (int nLoop = 0; nLoop < 2; nLoop++) { DataList.DataItem item = new DataList.DataItem(); item.Name = name; item.Id = count.ToString(); sl.data_collection.Add(item); count++; } sl.Id = count; sl.Name = name; return sl; } } } - リビルド後、デバッグ実行を行い起動したブラウザにURLを入力します。
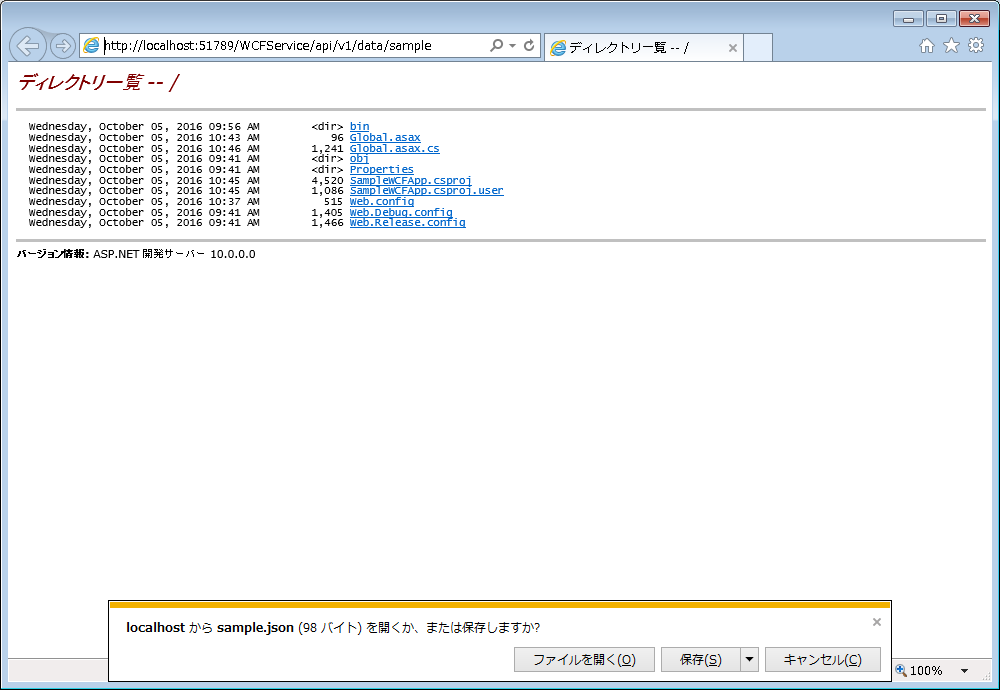
- JSON形式でデータがダウンロードされます。
ブラウザをChromeなどに変更すると、ブラウザ画面でJSON形式が表示されます。