WordPress使ってますか?プログラム言語やHTMLなどコードを記事で綺麗に整形してくれるプラグイン、「SyntaxHighlighter」の文字サイズの変更した際の備忘録的な記事として投稿しておきます。
レスポンシブルなデザイン
最近のWordPressのテーマはレスポンシブルなスタイルになっているので、文字サイズもブラウザの表示幅によって動的に変更されてしまいます。
ある意味仕方が無いのですが、「SyntaxHighligter」が吐き出したコード部分もその影響を受けて、文字サイズが大きくなってしまうのでコード部分が横に長くなってしまい、全体が見えなくなってしまいます。
サイトのStyle.cssでは変更不可
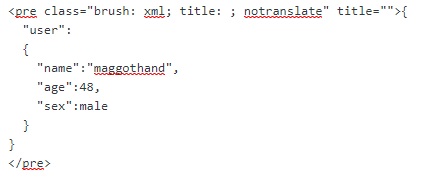
記事内に埋め込んだ「SyntaxHighligter」用のタグがプレビュー上でどうなっているか確認してみると、こんな感じになっています。

「brush」という名前のクラスでスタイルを定義しているので、このクラスを上書きすれば変更できそうです。
WordPress側の「外観|テーマの編集」でStyle.cssに「.brush」スタイルで文字サイズを変更してみましたが、変更できません。
SyntaxHighlighterのスタイルシート
プラグインのスタイルシートは以下の場所にあります。
/wp/wp-content/plugins/syntaxhighlighter/syntaxhighlighter3/styles
フォルダ内の「shCore.css」がスタイルのベースになっているようで、次のように定義されています。
.syntaxhighlighter a,
.syntaxhighlighter div,
.syntaxhighlighter code,
.syntaxhighlighter table,
.syntaxhighlighter table td,
.syntaxhighlighter table tr,
.syntaxhighlighter table tbody,
.syntaxhighlighter table thead,
.syntaxhighlighter table caption,
.syntaxhighlighter textarea {
-moz-border-radius: 0 0 0 0 !important;
-webkit-border-radius: 0 0 0 0 !important;
background: none !important;
border: 0 !important;
bottom: auto !important;
float: none !important;
height: auto !important;
left: auto !important;
line-height: 1.1em !important;
margin: 0 !important;
outline: 0 !important;
overflow: visible !important;
padding: 0 !important;
position: static !important;
right: auto !important;
text-align: left !important;
top: auto !important;
vertical-align: baseline !important;
width: auto !important;
box-sizing: content-box !important;
font-family: Monaco, "Consolas", "Bitstream Vera Sans Mono", "Courier New", Courier, monospace !important;
font-weight: normal !important;
font-style: normal !important;
font-size: 1em !important;
/*min-height: inherit !important; */
/*min-height: auto !important;*/
direction: ltr !important;
-webkit-box-shadow: none !important;
-moz-box-shadow: none !important;
-ms-box-shadow: none !important;
-o-box-shadow: none !important;
box-shadow: none !important;
}

.syntaxhighlighter {
width: 100% !important;
margin: 1em 0 1em 0 !important;
position: relative !important;
overflow: auto !important;
overflow-y: hidden !important;
font-size: 1em !important;
}
ほとんどの属性値が、importantになっているために、サイト側のスタイル変更の影響を受けない作りになっています。
importantを変更して、サイト側のスタイルで上書きする手段もありますが、今回は直接変更する形にしました。
フォントサイズがem単位で設定されているため親要素と同じサイズになってしまうので、remに変更してルート要素でのサイズ変更に対応させて調整しました。
実際のコード的にはこんな感じ
font-size: 1.4rem !important;
/*font-size: 1em !important; */
サイズは実際の表示を確認しながらの調整ですが、このブログの場合にはこのくらいのサイズで見やすくなりました。
「shCore.css」内にはfont-size属性を設定している部分が2ヶ所あるので注意してください。
スポンサーリンク
最後までご覧いただき、ありがとうございます。
